If you have ever unrolled a camping tarp, stared at a shapeless sheet of fabric, and had absolutely no idea what to do next — you are not alone. Unlike a tent, a tarp comes with no poles, no instructions, and no obvious form. It is just material, a handful of grommets, and the assumption that you already know what you are doing.
Here is the truth: knowing how to set up a tarp shelter is one of the most valuable outdoor skills you can develop — and it is far simpler than it looks once someone shows you the logic behind it.
Table of Contents
This guide does exactly that. You will learn what gear you need before you start, how to pitch five proven tarp configurations step by step — including setups with poles and without trees — the six mistakes that trip up most beginners, and which tarp to buy across three budget levels, with full pros and cons for each.
By the end of this guide you will have everything you need to go from never having rigged a tarp to confidently pitching one in any conditions.
Let’s start with the basics.
What Is a Camping Tarp and Is It Right for You?
A camping tarp is a flat or shaped waterproof sheet rigged between anchor points to create an open or semi-enclosed shelter. Unlike a tent it has no built-in floor, no rigid pole structure, and no insect netting. It is a blank canvas — and that is both its greatest strength and its steepest learning curve.
Before committing to tarp camping, be honest about your situation:
A tarp works well if you:
- Want the lightest and most packable shelter system available
- Camp in environments with low insect pressure
- Are comfortable reading terrain and choosing a pitch location
- Want to combine your shelter with a bivy sack for full weather protection
- Are actively developing your outdoor skills beyond basic tent camping
A tarp is not the right choice if you:
- Are camping alone in genuinely remote terrain for the very first time
- Need insect protection — a tarp provides none
- Are camping with children who need a defined enclosed space
- Are in winter or heavy snow conditions without additional insulation layers
Still deciding between a tarp and a tent? Read our family tent vs backpacking tent comparison before going further.
What You Need to Set Up a Tarp Shelter
Choosing the Right Tarp
Size
Get the size right before anything else:
- Solo camper: minimum 2.5m x 3m — anything smaller limits your configuration options
- Two people: minimum 3m x 3.5m — gives adequate coverage in all five configurations
- General rule: larger gives more flexibility and coverage; the weight penalty is modest
Shape
- Rectangular — most versatile, works in all five configurations, best choice for beginners
- Square — slightly more configuration flexibility, marginally less coverage per metre of fabric
- Catenary cut — curved edges shed rain faster but are less beginner-friendly to rig correctly
Material
This is where most beginners get caught out. Not all tarp fabrics perform the same way in rain:
| Material | Weight | Wet Performance | Cost | Best For |
|---|---|---|---|---|
| Silpoly | Moderate | Excellent — stays taut | Mid | Beginners, wet climates |
| Silnylon | Light | Poor — sags when wet | Mid | Backpacking, dry climates |
| Polyethylene | Heavy | Good | Budget | Car camping, first tarp |
| Dyneema | Ultralight | Excellent | Premium | Ultralight backpacking |
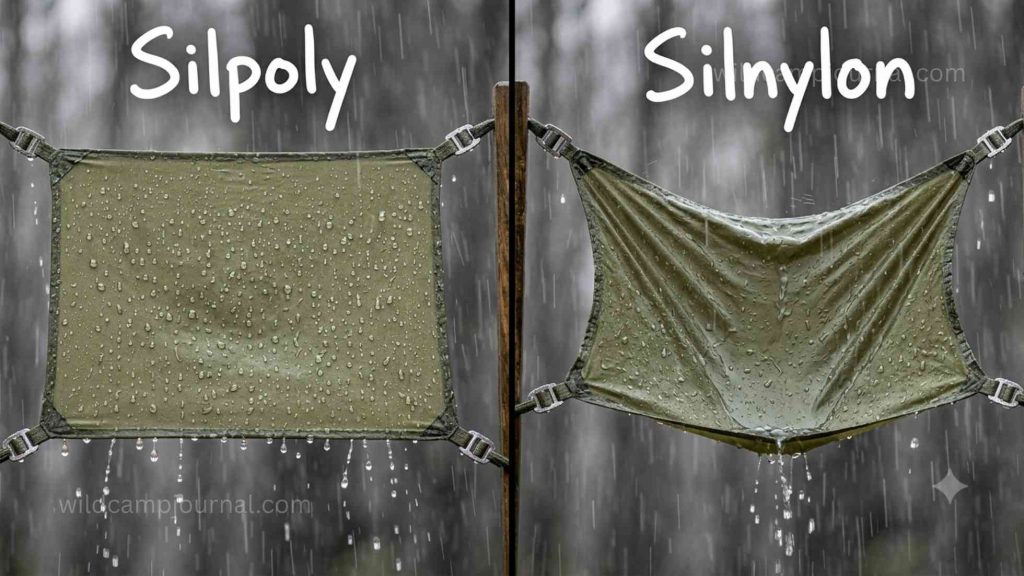
Recommendation for beginners: Choose silpoly. It does not sag or stretch when wet the way silnylon does, handles sustained rain better, and costs no more than silnylon alternatives. Silnylon is lighter but requires pre-tensioning before rain arrives — a skill beginners have not yet developed.
Anchor Points
- Trees — ideal spacing 3.5–5m apart; check trunk width is large enough to anchor straps safely
- Trekking poles — the most versatile non-tree anchor; fully addresses “how to set up a tarp shelter without trees” — covered in detail in Configuration 2
- Vehicles, fence posts, fixed campsite structures — use with wide straps to avoid damage
- Zero anchor points — stake-only low profile setup using the Solo Bivi Wrap configuration
Cordage and Stakes
- Guy lines: Dyneema cord is stronger and lighter than paracord — worth the small extra cost
- Minimum cordage: carry at least 20m for a basic single-tarp setup
- Stakes: V-shaped or Y-beam aluminium stakes hold significantly better than round wire stakes under lateral load — this matters when a tarp is tensioned hard
- Carry spares: bring two extra stakes beyond what you think you need — you will use them
Three Knots Every Tarp Camper Must Know
You do not need to be a knot expert. You need exactly three:
- Bowline — creates a fixed loop at an anchor point that does not slip under load
- Taut-line hitch — adjustable tension on guy lines without untying and retying
- Prusik — attaches a ridge line to a tree without damaging the bark
Learn these three at home with dry rope in daylight before you need them in the dark with wet hands on a hillside. Ten minutes of practice eliminates the single most common source of tarp frustration.
Before you pitch — watch how an experienced tarp camper rigs a complete setup from scratch in real woodland conditions.
5 Tarp Shelter Configurations — From Easiest to Most Advanced
All five configurations below use the same basic kit — just rigged differently. Master Configuration 1 first. Every other configuration is a variation on the same principles.
| Configuration | Difficulty | Best Conditions | Trees Required? |
|---|---|---|---|
| 1. A-Frame | ⭐ Beginner | Rain and moderate wind | No — poles work |
| 2. Lean-To | ⭐ Beginner | Sun shade and light wind | No — poles work |
| 3. Enclosed A-Frame | ⭐⭐ Intermediate | Sustained rain and cold | No — poles work |
| 4. Plough Point | ⭐⭐ Intermediate | Strong wind from one direction | No — poles work |
| 5. Solo Bivi Wrap | ⭐⭐⭐ Advanced | Ultralight and emergency use | One point only |
Configuration 1 — The A-Frame

When to Use It
The A-Frame is the go-to configuration for beginners and experienced tarp campers alike. A ridge line runs between two anchor points and the tarp drapes symmetrically over it — forming an inverted V shape that sheds rain in both directions and deflects wind from any angle.
Use it as your default configuration in three-season conditions whenever you have two anchor points available.
Step-by-Step Setup
- Identify two anchor points 3.5–4m apart — trees, trekking poles, or fixed structures
- Tie your ridge line between them at chest height using a bowline at each end
- Drape the tarp centrally over the ridge line — equal fabric hanging on each side
- Stake out all four corners at a 45-degree angle away from the tarp
- Tension the ridge line until both sides are taut with no visible sagging
- If wind picks up — lower the windward side closer to the ground to reduce exposure
“Prefer to watch the A-Frame pitched in real time? This step-by-step video shows the full setup from ridge line to final stake.”
Common A-Frame Mistakes
- Ridge line too high → large gaps at ground level, rain and wind blow straight in — fix: keep ridge line at chest height maximum
- Ridge line too slack → tarp sags in the middle and pools water — fix: tension the line until both sides hold a clean angle
- Stakes driven straight down → pull out under lateral load — fix: always angle stakes at 45 degrees away from the tarp
- Sides tensioned unevenly → one side flaps in wind — fix: check both sides have equal tension before finishing
Configuration 2 — The Lean-To (With or Without Trees)
When to Use It
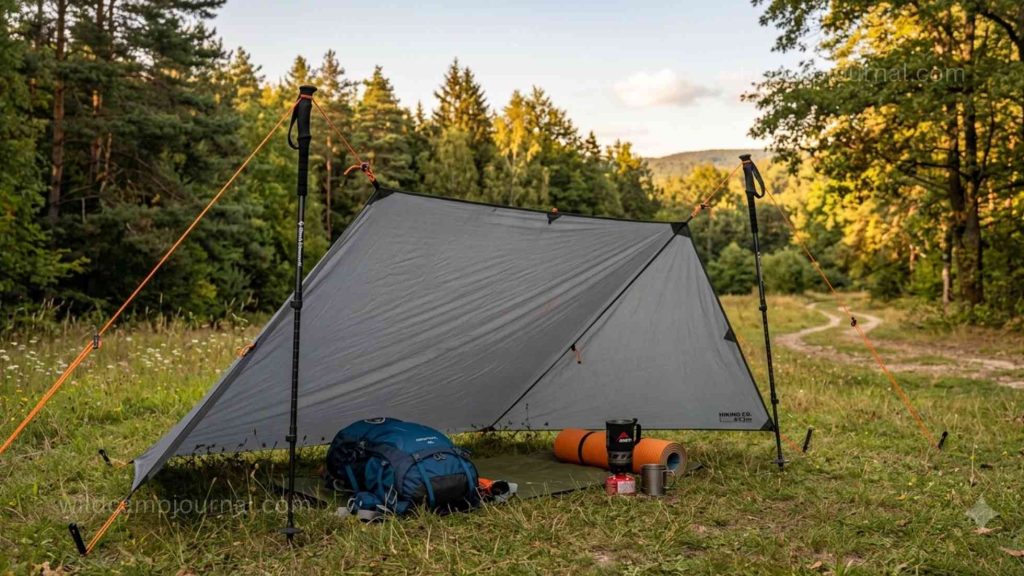
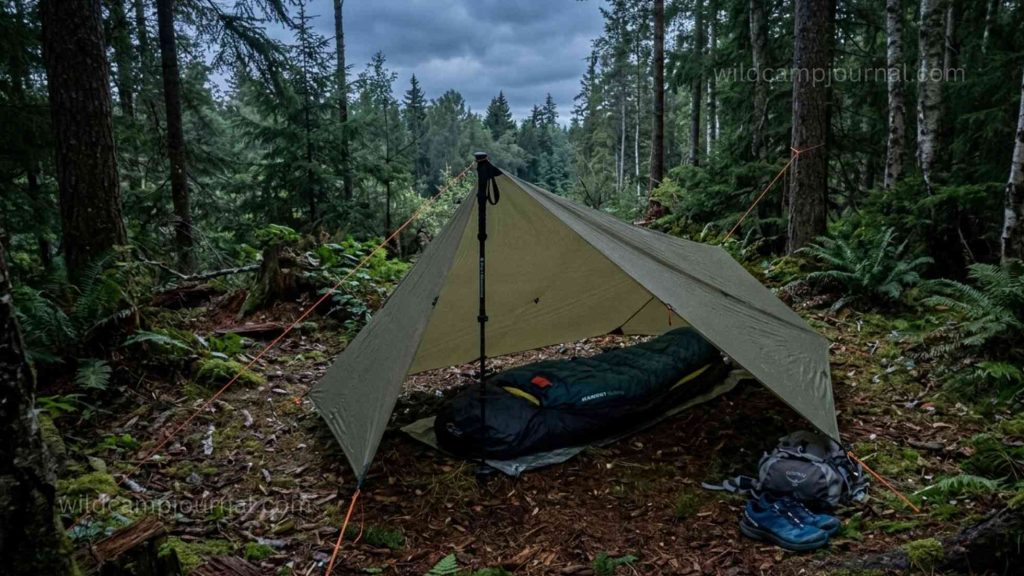
The lean-to is a single-slope configuration — one high edge, one low edge, open on three sides. It is the most social tarp setup, ideal as a camp kitchen cover, a sun shade, or a rain shelter for a group gathering area.
It is also the definitive answer to setting up a tarp without trees — two trekking poles replace the trees entirely.
Note: the lean-to is not a sleeping shelter in heavy rain. The open sides give no lateral protection. In sustained rain, switch to the A-Frame or Enclosed A-Frame.
Step-by-Step Setup With Trekking Poles (No Trees Needed)
- Extend two trekking poles to full height and place them 3–4m apart
- Attach the high edge of the tarp to both pole tips using guy lines — one line per pole tip
- Stake the base of each trekking pole firmly — poles must not shift under tarp tension
- Pull the low edge of the tarp out at a 45-degree angle away from the high edge
- Stake the two low corners firmly into the ground
- Add two mid-point guy lines from the sides of the tarp for wind stability
- Adjust the pitch angle — steeper sheds rain better; shallower gives more headroom
How to Stop a Tarp Canopy From Sagging
Sagging is almost always caused by one of four things — fix the cause, not the symptom:
- Add a third centre support pole under the mid-point of the ridge edge
- Increase tension on the two high corner guy lines until the edge holds a straight line
- Switch from silnylon to silpoly — silnylon stretches when wet and sags regardless of tension
- Rig a taut ridge line along the top edge before attaching the tarp — the line carries the load, not the fabric
Configuration 3 — The Enclosed A-Frame
When to Use It
The Enclosed A-Frame is a standard A-Frame with both open ends partially closed using the tarp’s excess fabric folded inward. It delivers significantly better rain and wind protection than the open A-Frame and is the closest a tarp comes to replicating the enclosed feel of a tent.
Use it in sustained rain, cold conditions, or exposed coastal sites where wind comes from multiple directions.
Step-by-Step Setup
- Complete steps 1–5 from the A-Frame setup above
- At each open end, fold the excess overhanging fabric inward and downward
- Stake the folded end panels to the ground — one stake per folded panel
- Leave a deliberate 20–30cm gap between the tarp edge and the ground at each end
- Adjust the gap — wider in mild conditions for airflow, narrower in heavy rain for protection
Important: the gap at ground level is not optional. Without it, condensation from two people breathing inside a closed tarp builds rapidly and soaks sleeping gear from the inside. Airflow is how you manage this.
Configuration 4 — The Plough Point
When to Use It
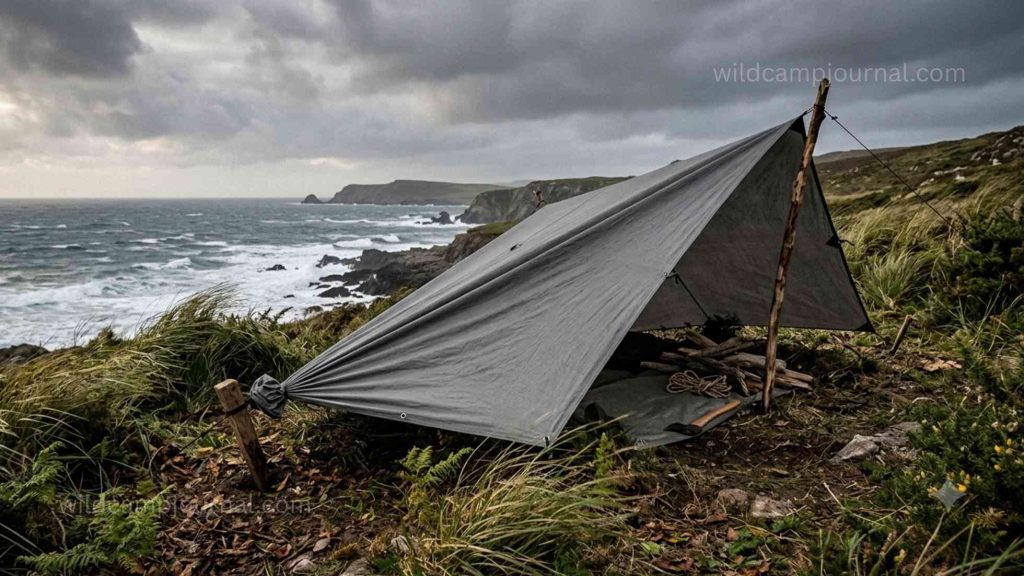
The Plough Point closes one end of the tarp down to a single staked point — like the prow of a ship — while leaving the other end open and high. The closed pointed end faces into the prevailing wind, deflecting gusts efficiently without the flat wall of fabric that makes other configurations vulnerable.
Use it on exposed ridges, coastal pitches, or any location where wind comes consistently from one predictable direction.
Step-by-Step Setup
- Rig your ridge line between two anchor points with one end 30–40cm lower than the other
- Drape the tarp over the ridge line with more fabric hanging at the lower end
- Gather all the fabric at the low end into a single point — pull all four edges together
- Stake the gathered point to the ground with one central stake driven at 45 degrees
- Stake the open high end at the two corners normally
- Add side guy lines at the midpoint of each long edge for additional stability in gusts
Configuration 5 — The Solo Bivi Wrap
When to Use It
The Solo Bivi Wrap is the most minimal configuration in this guide — a single anchor point, four stakes, and a tarp wrapped tightly around one person’s sleeping position. It is the warmest tarp configuration because the enclosed wrap minimises exposed air volume, reducing heat loss significantly.
Use it for solo ultralight backpacking, emergency shelter situations, or as a complement to a bivy sack for complete single-person weather protection. Always pair with a bivy sack — the tarp wraps around you but provides no floor or moisture barrier. Read our bivy sacks explained guide for the full pairing setup.
Step-by-Step Setup
- Identify a single anchor point — one tree or one trekking pole at full extension
- Tie one top corner of the tarp to the anchor point at head height using a bowline
- Stake the diagonally opposite low corner to the ground at a low, flat angle
- Pull the two remaining corners out to each side and stake at 45-degree angles
- The tarp forms a low diamond or cone shape around your sleeping position
- Crawl inside with your bivy sack — adjust the head-height anchor up or down to tighten or loosen the wrap around the sleeping system
How to Set Up a Tarp Over a Tent — and Under a Tent
Tarp Over a Tent
A tarp pitched over an existing tent adds a second waterproof layer — useful when a tent’s flysheet HH rating is too low for sustained heavy rain, or when you want to extend the dry zone around the entrance as an improvised vestibule.
Setup with two trekking poles and no trees:
- Position one trekking pole at each end of the tent at full height
- Tie a ridge line between the two pole tips — approximately 30cm above the tent apex
- Drape the tarp centrally over the ridge line
- Stake the four tarp corners out beyond the tent’s own guylines
- Ensure the tarp edges extend at least 40cm beyond the tent sides on each face
The key measurement is the 30cm gap between the tent apex and the tarp — too close and condensation transfers between the two layers.
Tarp Under a Tent
Using a tarp as a groundsheet under your tent protects the tent floor from abrasion and reduces moisture transfer from wet ground — particularly important for budget tents with lower floor HH ratings.
Critical sizing rule: cut or fold the tarp so it sits 5cm inside the tent’s perimeter on all sides. A groundsheet that extends beyond the tent edges channels rainwater underneath the tent floor rather than away from it — the opposite of what you want.
6 Common Tarp Setup Mistakes — And How to Fix Them
Getting these wrong does not just make camping uncomfortable — in bad weather it can make it genuinely dangerous. Know them before you pitch.
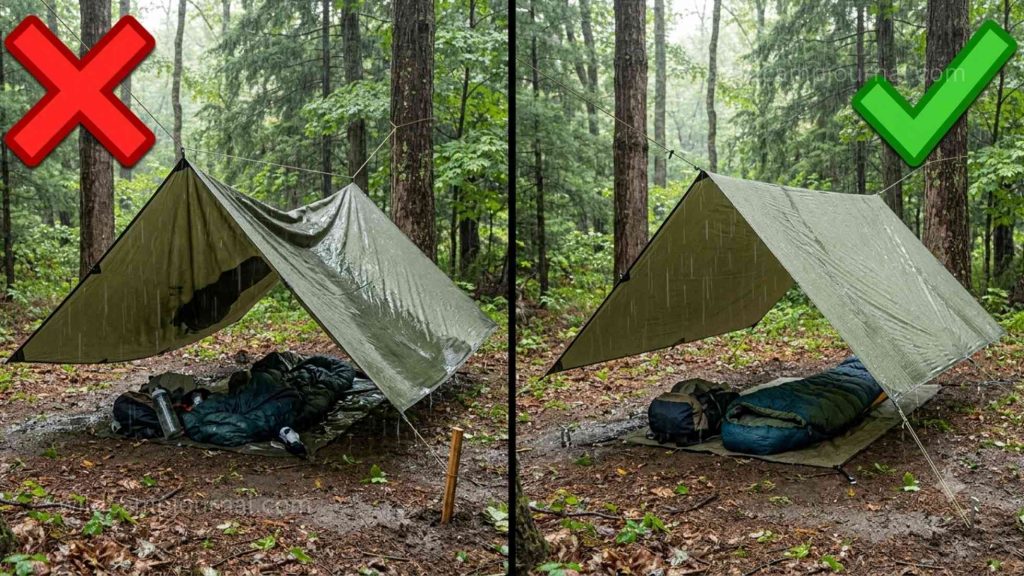
1. Ridge line too high Gaps at ground level let rain and wind drive straight into the sleeping area. Fix: keep the ridge line at chest height maximum for sleeping shelter configurations.
2. Using silnylon without pre-tensioning Silnylon stretches when wet — a taut pitch before rain becomes a sagging, pooling mess when it arrives. Fix: use silpoly, or pre-tension silnylon tighter than feels necessary before rain starts.
3. Stakes driven straight down A stake driven vertically into the ground resists vertical load only. A tarp guy line pulls at an angle — a straight-down stake pulls clean out under any lateral tension. Fix: always drive stakes at a 45-degree angle away from the tarp.
4. Too few anchor and stake points A tarp with only four corner stakes will flap, collapse, and invert in moderate wind. Fix: use a minimum of six stake points for any A-Frame in exposed conditions — add mid-edge guy lines as standard.
5. Pitching in a hollow or depression Water runoff from surrounding ground collects directly underneath your shelter. Fix: always pitch on slightly raised or gently sloped ground — even a few centimetres of elevation makes a significant difference in heavy rain.
6. Hooking directly into corner grommets in high wind Corner grommets take the full load of the tarp in wind and tear under sustained stress. Fix: in high-wind conditions use a prussik loop tied around the body of the tarp at each corner rather than attaching directly to the grommet — this distributes the load across a larger area of fabric.
“Still not sure if your setup is right? This video walks through the most common tarp mistakes and shows exactly what correct tension and staking looks like.”
Our Top 3 Tarp Recommendations for Beginners
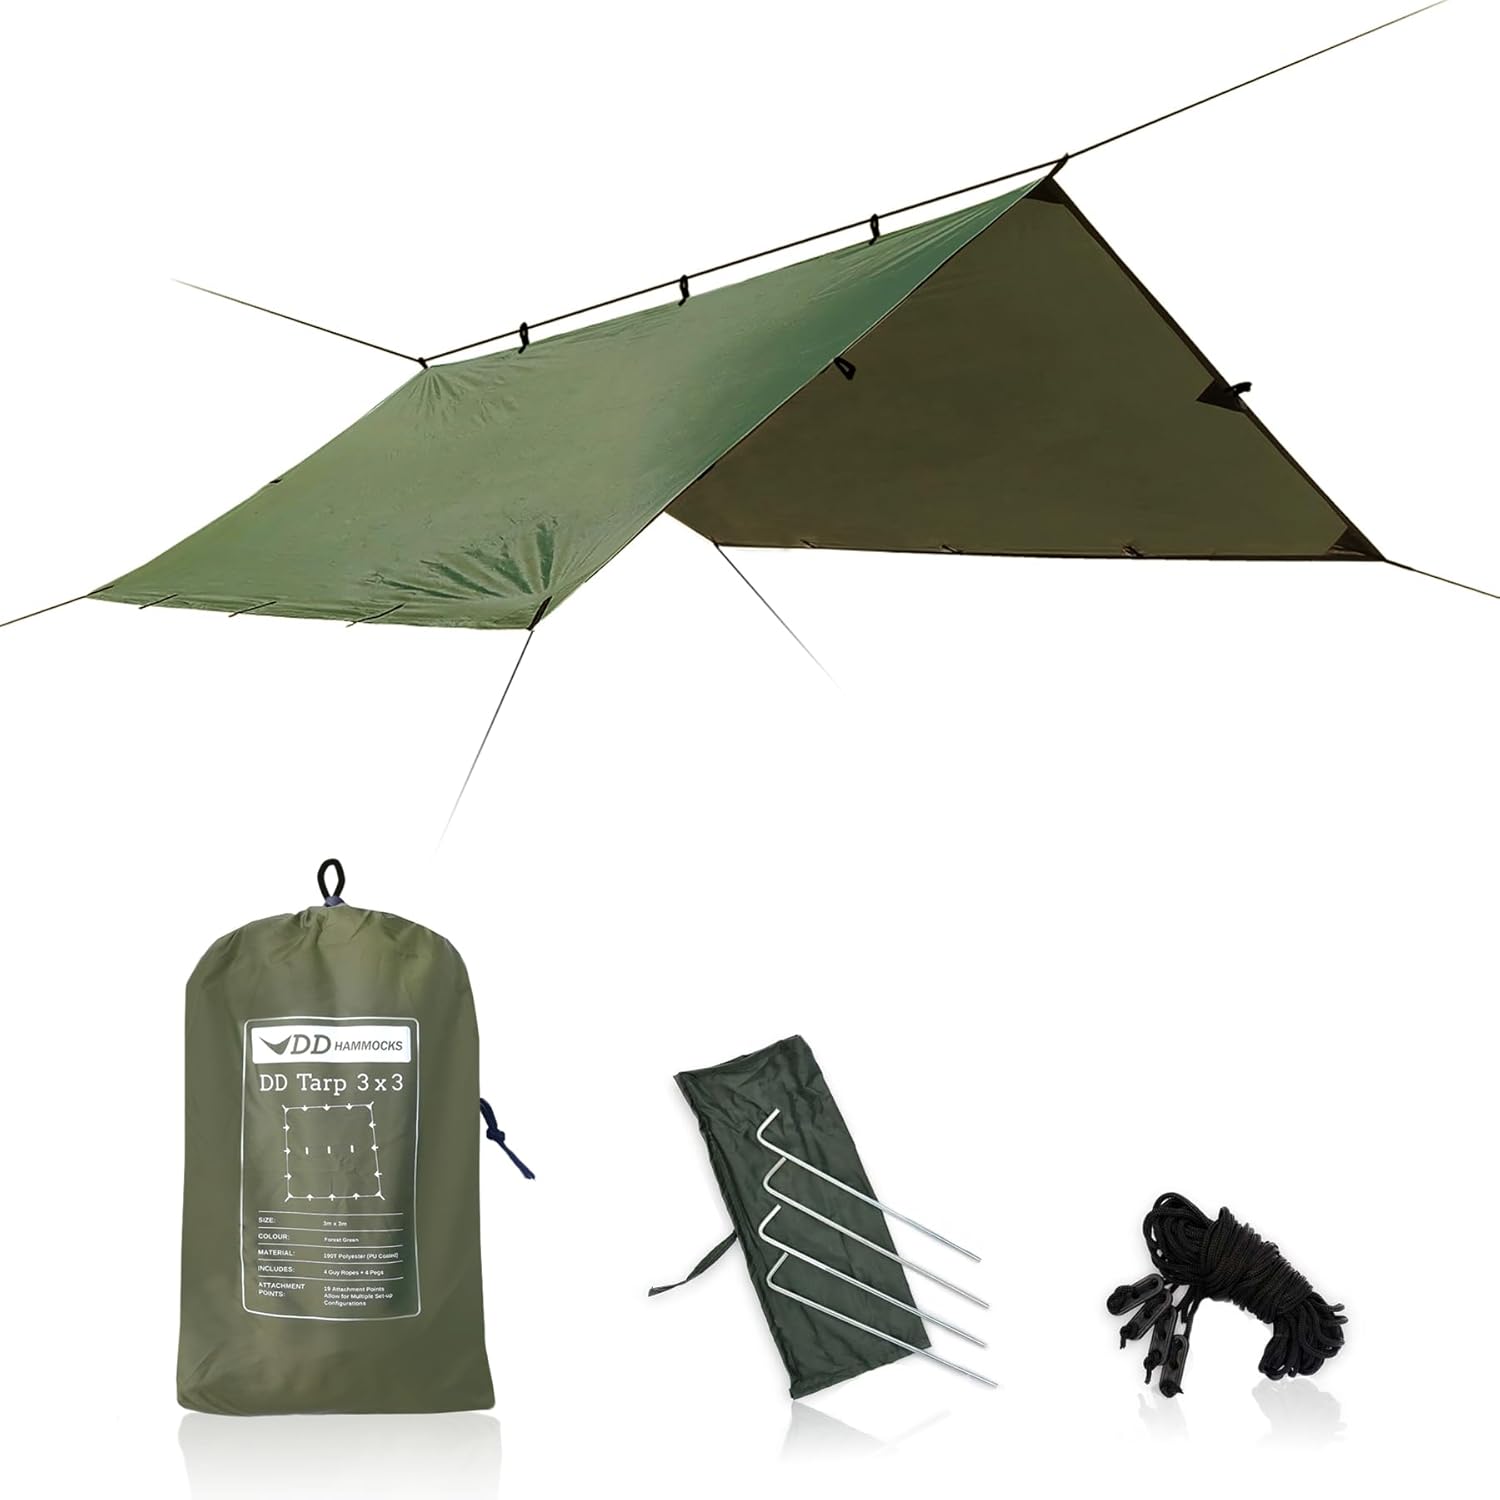
🥇 Budget Pick — DD Hammocks 3×3 Tarp
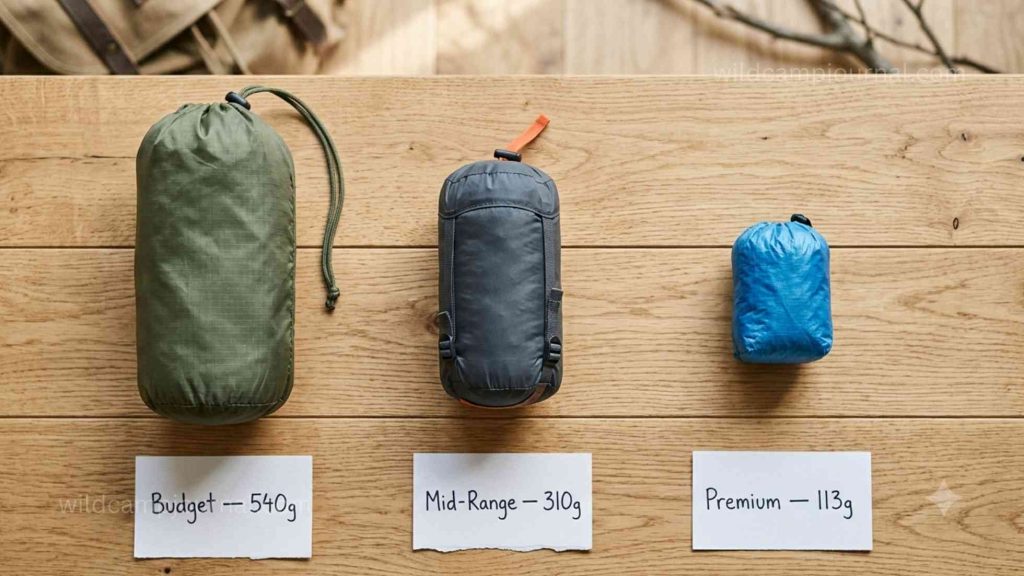
Price: $35–$45 | Size: 3m x 3m | Weight: 540g Material: Silpoly | Attachment points: 19 | Stuff sack: Not included
The DD Hammocks 3×3 is the most versatile budget tarp available. Nineteen attachment points give beginners maximum flexibility across all five configurations — most budget tarps offer eight to ten. The silpoly fabric stays taut when wet, which is the most important performance characteristic for a beginner’s first tarp.
Who it is right for: Any beginner buying their first camping tarp. The 19 attachment points and silpoly material give you the best possible foundation for learning all five configurations without spending mid-range money.
🥈 Mid-Range Pick — Sea to Summit Escapist Tarp
Price: $80–$100 | Size: 3m x 2.8m | Weight: 310g Material: Silnylon 15D | Attachment points: 14 | Stuff sack: Included
The Sea to Summit Escapist is the lightest tarp at this price point that still provides full three-season coverage. At 310g it packs to the size of a large fist — making it the first tarp that genuinely disappears into a backpacking kit without demanding its own dedicated space.
Who it is right for: Weight-conscious backpackers who have already mastered the A-Frame and want a tarp that genuinely reduces pack weight without sacrificing real-weather performance.
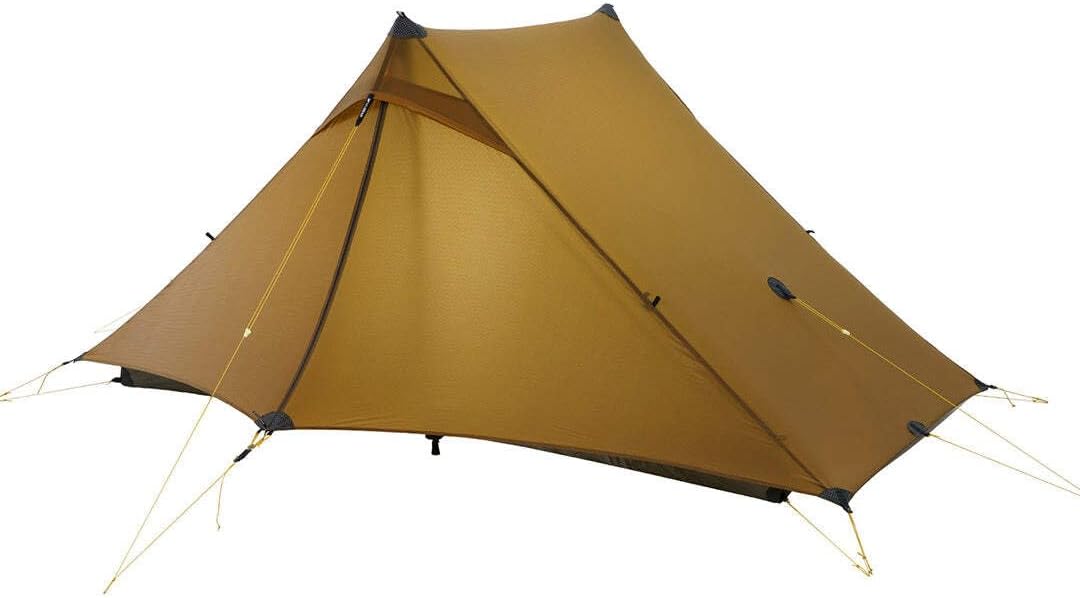
🥉 Premium Pick — Gossamer Gear Twinn Tarp
Price: $135–$160 | Size: 2.9m x 2.4m (head) x 2.1m (foot) | Weight: 269g Material: Silicone-coated nylon | Attachment points: 10 | Stuff sack: Included
The Gossamer Gear Twinn Tarp is an absolute favorite among ultralight backpackers who want reliable weather protection without a weight penalty. While originally designed to fit two people snugly, it has become a legendary “palace” for solo hikers. Its catenary cut (curved edges) makes it incredibly easy to get a taut, wind-resistant pitch every time, and the custom 10-denier fabric packs down to the size of a soda can.
Who it is right for: Experienced solo backpackers doing long-distance routes who have outgrown heavier tarps and want a shelter that adds almost nothing to pack weight while delivering best-in-class performance.
Quick Comparison Table
 DD Hammocks 3×3 |
 Sea to Summit Escapist |
 Gossamer Twinn Tarp |
|
|---|---|---|---|
| Price | $35–$45 | $80–$100 | $135–$160 |
| Weight | 540g | 310g | 269g |
| Material | Silpoly | Silnylon 15D | Nylon |
| Size | 3m x 3m | 3m x 2.8m | 2.9m x 2.4m |
| Attachment Points | 19 | 14 | 10 |
| Sags when wet? | No | Yes | No |
| Best for | Beginners | Backpackers, weight-conscious | Backpackers |
| Lifespan | 4–6 Seasons | 4–6 Seasons | 3 Seasons |
Frequently Asked Questions
How do you set up a tarp shelter without trees?
Use two trekking poles as uprights in place of trees. Extend both poles to full height, space them 3–4m apart, and attach the top edge of the tarp to each pole tip using guy lines. Stake the pole bases firmly and stake the low corners of the tarp at 45-degree angles. All five configurations in this guide work with trekking poles as the primary anchor — no trees required.
What is the easiest tarp shelter to build?
The A-Frame is the easiest configuration for beginners. It requires two anchor points, one ridge line, and four stakes. On a first attempt it takes 10–15 minutes. With practice it takes under five. Master the A-Frame before attempting any other configuration — every other setup in this guide builds on the same principles.
What is the warmest tarp shelter configuration?
The Solo Bivi Wrap is the warmest tarp configuration because it wraps tightly around the sleeper and minimises exposed air volume. For maximum warmth combine the Bivi Wrap with a bivy sack and a sleeping bag rated at least 5°C below the expected overnight low temperature.
What is the best material for a camping tarp?
Silpoly for beginners and three-season camping — it does not sag when wet, handles sustained rain reliably, and costs no more than silnylon. Dyneema is the best material for ultralight backpacking where weight is the primary constraint. Avoid cheap polyethylene tarps for anything beyond car camping — they are heavy and degrade quickly under UV exposure.
How long does a tarp shelter last?
A quality silpoly or silnylon tarp lasts 4–6 seasons with proper care — dry before storing, avoid prolonged UV exposure, do not store compressed for extended periods. A Dyneema tarp lasts significantly longer — 8–12 seasons or more. Budget polyethylene tarps last 1–3 seasons depending on use frequency and UV exposure.
How long will a heavy-duty tarp last outside?
A heavy-duty polyethylene tarp left permanently outdoors degrades in 1–2 years due to UV breakdown, even with UV treatment. Purpose-made camping tarps are designed for intermittent field use — not permanent outdoor installation. Pack them away between trips to maximise lifespan.
How do you set up a tarp shelter alone?
All five configurations in this guide can be pitched solo. The Solo Bivi Wrap requires only one anchor point and is the simplest solo setup. For the A-Frame, tie one end of the ridge line first, walk the other end to the second anchor, tie off, then drape and stake the tarp working from one corner to the next. The entire process takes under ten minutes solo once you have practised at home.
Conclusion
Setting up a tarp shelter is not complicated — but it is a skill that needs to be practised before you rely on it. Every configuration in this guide follows the same core logic: two anchor points, a ridge line, four corners staked at 45 degrees. Master that logic with the A-Frame and everything else becomes a variation on a theme you already know.
The single most important thing you can do before your next camping trip is set up your tarp in the garden this week. Tie the three knots. Pitch the A-Frame. Lower one side in an imaginary wind. Take it down and do it again. Ten minutes of practice at home is worth two hours of frustration in a field at dusk.
If you are ready to buy, the DD Hammocks 3×3 is the clearest starting point for most beginners — maximum attachment points, silpoly fabric, and a price that makes the learning curve low-stakes.
Next in the Shelter & Sleep series: 👉 Best Sleeping Bags by Temperature Rating 👉 Bivy Sacks Explained — The Perfect Tarp Companion
Back to pillar: Complete Shelter & Sleep Gear Guide Back to hub: 10 Camping Gear Mistakes That Ruin Your Trip